Shopify Say hello to your store Email template Text version
[Log in](https://www.shopify.com/login?ui_locales=en)

Welcome to Shopify!

Your free 14-day trial starts now.

We're excited to help your business grow, like millions of entrepreneurs in 175 countries around the world, who've achieved over $200 billion USD in sales with Shopify.

[Login](https://www.shopify.com/login?ui_locales=en)

Getting started

Your step-by-step checklist

There are many moving parts to getting a business up and running, so to keep you organized and on track, check out our New to Shopify checklists.

[See the complete checklist](https://www.shopify.com/login?ui_locales=en)

Get a custom domain

Getting a domain is the first step in creating an online presence. This is where customers will be able to find your store. Shopify offers automated setup and makes it easy to manage your domain, all in one place.

[Get a domain now](https://www.shopify.com/login?ui_locales=en)

“I’ll never forget our first Shopify sale… we were open for business right there, it was amazing.”

Dan, Unbound Merino


© Shopify, 151 O'Connor Street, Ground floor,Ottawa ON, K2P 2L8

[Unsubscribe](#)

[Manage your email preferences](#)

Shopify.MailID:1-1.62911131.10719360.359ff72452a5c403d1131c900b3faf04This email template was created using Pagenflow's email template builder. Please note that Shopify as an entity was not involved in the creation, design, or distribution of this template.
Seamless Compatibility
Design once, send everywhere
Your emails will look perfect across all major email clients and devices.
How it works
How to Edit Shopify Email Template
Follow these steps to clone, customize, and export your email template using our free email template builder.

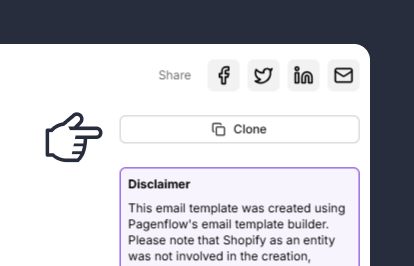
Clone the Email Template
Start by cloning the email template you want to edit. Cloning creates a duplicate of the original template, allowing you to make changes without affecting the original design.
Note: This step ensures you have a fresh copy to work with, preserving the original template for future use.
Step 2: Update the Template Content
Note: This step allows you to tailor the template to your specific campaign or purpose.
Step 3: Customize the Design
Note: This step ensures your template is visually appealing and consistent with your brand identity.
Step 4: Test the Template
Note: This step helps you catch and fix any issues before sending the email to your audience.
Step 5: Export the Template
Note: This step finalizes your template and makes it ready for use in your campaigns.


